Friday, November 8, 2013

The Threat That Became Our Reality-Part 2

I was lucky when I decided to start homeschooling. I had a few friends, neighbors, and a sister-in-law who already homeschooled their children.  But before I asked for information from my “experts”, I decided to research curriculum on my own first.  As I started researching, I realized there was way more curriculum out there than I ever dreamed of, and it quickly became overwhelming and stressful. There was so much to choose from; how do I pick the correct one for my kids?

I already had some experience with Saxon Math and I knew that was the route I wanted to go. I used it once before and I loved how comprehensive it was, so math was easily taken care of.  But what about the other subjects? Science, History, Language Arts, Writing, Art, etc.; how was I going to find something that worked for my family? Coming up with these subjects on my own was terrifying, so I turned to my “experts”. They each had their own ideas of how it should be done. I had one friend who was a big fan of the Thomas Jefferson Style mingled with Charlotte Mason. I had one friend who was big into Kimber Academy. And then I had a sister in law who was very eclectic.  Some of them would give me books to read: Charlotte Mason, Thomas Jefferson, Well-Trained Mind, etc. They would tell me I needed to pick a style of learning/teaching; something I didn’t understand. I was pretty one track minded, I just need a curriculum.  How could I even think about a style? I didn’t even understand what that meant.  I just wanted to know what to teach.

I was very blessed to have a friend with some resources, who was able to through together a homeschooling conference for me (and other newly starting out HSers).  She gathered a bunch of different speakers who talked about the different styles of homeschooling. There was one for Thomas Jefferson, one for Charlotte Mason, one for Unit Studies, and Kimber Academy, and some others I don’t remember too well.  She also had a speaker, Glen Kimber, who spoke on homeschooling in general; he was by far my favorite.

I loved how each speaker explained the main points of “their” style and then how they implicate it in their homes. Then afterwards, I was able to thumb through some of the curriculum to get a feel for what the curriculum was like. I learned that although I liked unit studies for some things, maybe not as a complete way of learning. I learned that although Kimber Academy was nice for some, it didn’t really click with my personality.  I learned that there were parts of Thomas Jefferson (TJ ed) and Charlotte Mason style that I loved, but I really couldn’t commit to either one. I realized that I am just an eclectic type person, and chose to pick and choose to do some TJed, some CM, and some Well-Trained Mind.

My favorite piece of information that I gathered from the Conference came from Dr. Kimber. He said many wonderful things that I still ponder upon today, but the thing that stood out most was “It takes a good three years to get your groove in homeschooling”. I don’t know if those were his exact words, but it is close.  This helped me so much the first couple of years, because I realized that it didn’t have to be perfect to start out. I might try something and it may not work out, but each year is a growing process.  Each year you get a little closer to finding your niche in how to go about it for your family and what curriculum to use.  This knowledge took a lot of pressure off of my shoulders and helped me relax.  We took it slow and HAVE found what works for us.

In the end, I chose curriculum most similar to my sweet sister-in-law. After my careful research and her tips on what she used and what she wished she used, I chose curriculum that was very close to hers. Hey we are family for a reason, similar personalities in certain aspects.  That first year I chose Saxon for Math, Apologia for Science, I Love America and Rainbow Book of American History for history, Abeka Language for Language Arts, Spelling Power for spelling, some random penmanship books, etc.  There were things I liked, some things I didn’t, some things the kids didn’t like, and some things I thought we could improve on.  

The thing I love about homeschooling is knowing where my kids are in their learning, knowing their strengths, and knowing their weaknesses. I like that if something isn’t working I can change to something that will work. I like that there is so much to choose from and that there is something out there for every personality and every type of learner. I like that I don’t have to settle for mediocre, and that I GET TO CHOOSE what is right for my children. I like living on MY schedule and that I can choose our days off and not rely on someone else’s schedule. I found that life is easier for my family, we are happier, and we spend more time together quantity wise and quality wise. We have had so much fun with our field trips and learning so far. We have grown through the years and we have found our groove. We have tried different types of curriculums, we have come back to some of our originals, and we have found some that work better for us.  We have thrived!

We are still growing and changing and improving each year. It has been a wonderful journey for us. The number one thing I have found was to include God.  I have learned to pray before buying any curriculum, and it has saved us tons of money. Through prayer, I have been guided to buy curriculum that I originally had no interest in, and it has become some of my favorites.  Through prayer, I have also been guided to not buy certain curriculum that I thought I would like, which I am sure has saved me a ton of money because I know God knows my personality and he knows what will and won’t work for us. There have been three times only that I didn’t pray about certain curriculum, because I was overly confident thinking I knew I would love it. Each time I have bought without praying for direction first, I have HATED what I bought.  They were expensive mistakes, even if I can resale them in the end. I don’t have a lot of money to spend, and most of what I buy needs to be an investment.  When I waste money on curriculum that doesn’t work for us it annoys me to no end. So my greatest advice I could give anyone starting out is this: Pray, Pray, Pray. Pray for guidance for your family’s needs. Pray about your curriculum. Pray for help to know how to get started. And pray to know His will. God knows you better than anyone else, even better than you know yourself, and he can guide you to know how to teach your family in the best way that will bring you the most success and joy.

Good Luck in your personal adventures.

Monday, September 30, 2013

The Threat That Became Our Reality-Part 1


I have recently joined a couple of home school Facebook pages and I have been watching as many new people are taking the leap to home school.  I know how scary it is. They have so many questions and they are looking for any help they can get. I've been there and it is quite overwhelming to know where to start. After seeing so many people searching for some direction, I felt like it was time to share my journey in hopes that it can help even one other person.


Four years ago, my oldest daughter was being quite grouchy with me as she was getting ready for school one day and I turned to her and said, “If you don’t start changing your attitude, I am going to pull you out of school and home school you next year.” Now I had no desire to home school at that point and had no way of knowing what her response would be.  But alas, she turned to me and said, “Good. I want to be homeschooled.” I stood there dumb founded. I could not even say anything. I just stood there in shock, wondering what had just happened. Wow, that didn’t go how I planned.  I took my three kids to school (K, 3rd, and 4th grade) and couldn’t even bring myself to say anything about our conversation at that time. But I sat wondering, WHY? Was she being bullied at school? What would make her WANT to be homeschooled?

When I picked up my children from school that day, I finally asked her about it. “Were you serious about wanting to home school next year?” She answered, much calmer than that morning, “Yes.” And at that time my 3rd grader pipes in excitedly, “I want to be homeschooled too.”

“But, why?” was my reply.

The answer that came was most unexpected. She told me how bored she was in school.  How she finishes her work super fast and then is required to sit doing nothing for an hour as she waits for her class mates to finish their work.  And how she isn’t even allowed to read a book or draw, she just gets to sit and wait. How often times she was asked to help the other kids understand their work. How school is just too easy and she wants to be challenged and move at her own pace. And how the kids who didn’t do their homework at home the night before, are given time at school to do it, while those that did are given other stuff to do while the others catch up. How she felt that was a waste of time, and she would rather be learning other things. And her list went on and on, and all the while my 3rd grader is chiming in his agreeance to everything she was saying.

I had no idea that was how school was for them. I knew they were smart and at the top of their classes, but I didn’t realize they were sitting around most of the time and bored. They never thought to tell me this before. And I never thought to ask questions that would bring these responses out. I was shocked at what good reasons she had for wanting to be home schooled.  I was also relieved that it wasn’t because of bullying or anything more serious.

I told my husband about the whole discussion that evening and his response was an automatic, “You’re not home schooling”. I got a little defensive and said, “I know. I’m just telling you what happened.” To be honest, homeschooling was far from my mind and I could understand his misgivings out it. You see, that year was the craziest year of our lives. My fifth child was about 10 months old at the time, he was born with seizures. We had been in and out of the hospital with him, and were having to see multiple doctors who were so hard to get into you had to accept any appointment time given to you (which were often very inconvenient). Plus we had Early Intervention coming into our home 2-3 times a week. He was on medication that slowed him down developmentally, caused numerous other problems, and caused sleeping problems.  I was not sleeping through the night and was extremely exhausted and stressed with his situation. To add to it, my 5 year old went to half day Kindergarten, which meant I was constantly at the school dropping kids off and picking them up from school. To say the least, I was a MESS!

Life was CRAZY for me, I could barely pull myself together (just ask my neighbors). And then the kids drop the bomb on me that they want to be homeschooled. “Are you CRAZY?” I thought, “I’m going to explode any minute and you want me to go even crazier.” I thought it would soon pass, so I didn’t ask again for another week. And then I waited another week and asked again. Each time it was the same answer, only they were more excited each time I asked. So the only thing I could do was to go pray about it.  And the answer came.  Yes, I was supposed to home school and I was told through prayer that my life would be much easier if I did. I didn’t know how that would be possible, but I trusted in the Lord and made the decision to home school. Though my husband wasn’t exactly thrilled with the idea at first, he also received a confirmation that it was what we were supposed to do.

I had only a few short months to prepare as it was coming closer to the end of that school year. At first, I thought we would just go with K12 because it was free. As I thought more about it, I thought, I will do all K12 except I want to pick my own history books because I don’t like how the public school teaches history. And then I thought, well and I also want to pick my own math for my kids. So I will do all K12 except history and math.  But it would be fun if . . . (and that was the end of my considering K12). If I was going to home school I wanted to pick my own curriculum and do it how I wanted, not how I was told.  So I set to work, discovering all I could find out about home schooling and different curriculums.

Thursday, September 26, 2013

Cultural Studies-Vietnam and Salsa

I have not been the best at blogging, but I am still going strong on not eating what I call fake foods. It would be a lie if I were to say that I have been perfect with it, because I haven't. It is a journey.
 
Confession time: Instead of making homemade tortillas one day, I used store bought. The week before I made fresh ones, I just ran out of time this week one day. And another day we took a .trip to the Kansas City LDS temple, which is two and half hours away. We ended up making a day out of the trip and were unprepared for dinner, so we were forced to stop for fast food. I even ordered fries to share, we rarely order fries. To be honest, it was gross, especially the fries. Ick. My body does not crave that stuff anymore. I half wonder how I ever liked that stuff.
 
Now for the good stuff. I canned a large batch of salsa. We live near an Amish community and I was able to get boxes of tomatoes, and cartons of jalapeno peepers and some bell peppers for dirt cheap. I was so thrilled I was able to can 36 jars (1/2 pints and half quart size). It took a whole day but was totally worth it. YUM!
 

For homeschool this year, we are learning World Geography and loving it. I found an absolutely awesome curriculum that the kids are learning from: Trail Guide to World Geography. We have been having so much fun with it. To add to our studies, I thought it would be fun to try out some dishes from different countries each week. This week, I chose to make a dish from Vietnam: Vietnamese chicken noodle salad (from: http://mediterrasian.com/delicious_recipes_vietnamese_chicken_noodle_salad.htm) This just looked so fresh to me and that is why I chose it.


Things I did different, I used bean noodles instead of rice. Though my son and I liked the noodles, my husband and other children didn't love them. So next time I'd just stick with the rice noodles. I also had trouble finding bean sprouts, so I used snap peas instead and through in some cherry tomatoes. This had a very unique flavor that we loved and I would definitely make it again.

Monday, September 16, 2013

Day 2-7 Preservative Free/Over Processed Free Diet

What a crazy week. I have been loving this new way of eating. I have made some homemade bread, hamburger buns, gluten free tortillas and pancakes (for a son), avocado cilantro hummus, granola bars (regular and gluten free), and so much more. I have been having so much fun with it.

The things I have noticed with this change in diet are: First, I get fuller faster and am not as hungry. Second, I have tons less cravings, especially sugar cravings. Before, I wanted treats all day long and one treat a day did not satisfy my cravings. I always wanted more and more. Now, I don't crave the sweets and when I have eaten some this week, one cookie or treat was enough. I even walked past a table of chocolate without any desire to stop. Sooooo cool and so freeing.

In all honesty,  I did experience some stomach cramping, bloating and gastrointestinal issues the first few days.  It has since passed, thank heavens. It was due to such a sudden change in eating I'm sure. Going from eating highly processed foods, tons of sugar, foods made with white flour and very little fruits and veggies to eating loads of fruit and veggies and all whole grains can do that to you. And as my body is cleansing from my old ways and adjusting to the new, I am feeling better and better each day. I don't know if I can go back.

Though it does take a little more time and effort and thought, the way my body is feeling is so worth it. But it doesn't take that much extra time and effort. I have been eating quite simply, with a green smoothie every morning and eating tons of fruit and veggies and hummus. I had originally planned to make all kids of crackers and other stuff, but am realizing that I don't really need them. I am much more choosy what goes into my body and the simple things seem to be enough, thus far. I feel like I am off to a great start.

Tuesday, September 10, 2013

Day 1 of My Process Free Month

Today I started my first day of processed foods free month. I should note as I get started that I don't plan to make everything from scratch, like condiments, etc. I just don't have that kind of time on my hands.  I mean, I am going to try and eat as little overly processed foods as possible. I am going to make all of my own bread, including hamburger buns, etc. Even though I'm not a huge cracker fan, my kids are. I plan to try and make a few cracker recipes I have pinned on Pinterest . I even plan to make my own corn tortillas and I may even attempt to turn them into tortilla chips, if I get ambitious. I have oh so many plans, but we will have to see what my time allows.

I started my day with a green smoothie sweetened with some agave and a scrambled egg. I must admit it was absolutely delicious. I should have taken pictures, but didn't. My secret to the most delicious eggs in the world is to cook them in a skillet with a little virgin coconut oil and I add a little milk to make them fluffy. I then spice it with some seasoning salt and a few drops of hot sauce and finally cook it to perfection. So good.

For lunch I made some homemade hummus, that was absolutely divine. My husband and I have always loved Cilantro Jalapeno Hummus and this recipe did not disappoint. I found it here: http://sweettreatsmore.com/2013/04/copy-cat-trader-joes-cilantro-jalapeno-hummus-a-giveaway/ . It was ridiculously easy and tasted even better than the stuff you buy. I love to eat it with veggies like petite bell peppers, carrots, snap peas, cucumber slices, and zucchini sticsk. I finished off my lunch with an apple.


For dinner I made a Chicken and Bacon Chopped Salad and Cornbread. I got the recipe for the salad here:  http://www.sixsistersstuff.com/2011/11/chicken-and-bacon-autumn-chopped-salad.html .  Some changes I made: I made my own Balsamic Dressing and Poppy Seed Dressing. I also used some chicken I had canned a year ago. The cornbread recipe is my favorite go to recipe that I have used for years. It is on the sweet side, because that is the kind I like. I will have to share that recipe at another time.

Pretty simple, but quite delicious.

Monday, September 9, 2013

I'm Back

It may have seemed that I have dropped off the planet or something, but I am finally back. It has been several crazy months.  From long summer vacation to moving to a home better suited for my family to family drama that has been bringing me down. But now that life has settled down I'm thinking it is also time for a change in some eating habits. For a while I have been having issues focusing and I know it has to do with two things; going to bed too late and not eating as well as I should.

After much deliberation, I have decided to take a challenge of going processed foods free for one month to see if things improve. That means no store bought bread, processed breakfast cereals or crackers or chips, etc. I will be making as much from scratch as possible to see if I can improve my health with food alone. Well and I have started running too =)

Tomorrow, I  start my NO Processed Foods Challenge and I hope you will join me on my journey.

Tuesday, May 14, 2013

Chocolate Peanut Butter Granola


We love breakfast in our house. I know I have said that before, but really it is one of our favorite meals of the day. ;)

Since I have been such a slacker on posting, I feel I really owe it to you to share my family’s all time favorite granola. We call it Chocolate Peanut Butter Granola. It is really the meal the kids dream of waking up to each morning and I make it more than all the other granolas we love. My kids beg for it. I usually double the batch because we like it so much and because we are such a big family.

I am calling this an original recipe of mine, because I have made so made changes over the years that you wouldn’t even recognize it coming from the original recipe. I make it how we like it, and hopefully you will like it as much as we do.


Chocolate Peanut Butter Granola

1 cup Agave or Honey ( I like Xagave best)

½ cup Virgin Coconut Oil

¼ cup Peanut Butter

½ cup Cocoa Powder

Small Pinch of Salt

2 tsp Vanilla Extract

6 cups Old Fashioned Oats

1 cup Coconut

1 cup Almonds or other chopped nuts


Preheat oven to 325 degrees F.

Combine agave, coconut oil, peanut butter, cocoa and salt in a saucepan. Warm till ingredients are melted and mixed well, but not boiling. Remove from heat and add the vanilla. Combine oats, coconut, and nuts in a large bowl; Pour the chocolate mixture over top and mix well.

Pour ingredients into baking dish or dishes. I like my granola soft so I will pour mine into an 9x13” pan and a 8x8” pan. They are pretty thick layers. If you want yours crunchy consider putting yours on a cookie sheet in a thin layer. Bake for 20 minutes and let cool. We like it best when it is completely cool.

One Serving equals One Cup.

Prettiest Cook on the Block Apron


I have been gone awhile, but that does not mean I have been idle. I have a bunch of posts that I need to post.


One of the things that kept me away and busy was a Girls Camp fundraiser that I helped put on. For the fundraiser, the girls in my ward chose to do a Spring Carnival/Bake Sale/Auction. It turned out really well and was a lot of fun. Behind the scenes it was also a lot of work for the leaders and a couple of the girls, but that is another story.

Anyway, for the Auction I chose to make an apron, because it is one of my favorite things to make. Who doesn’t want a cute apron to wear while you make all the yummy food, right? Honestly, I love to wear an apron that makes me feel pretty while I cook. I found this adorable fabric on clearance at Joann’s and I knew I could find a good use for it.
Yes, it was Easter fabric, but I thought it was cute enough for a year round apron.

The Picture really does this apron no justice. It was quite stunning. I wanted to keep it myself, but I decided since I had made it for the auction I should still donate it. 

I gathered the top a little to give it an even more feminine look.

I serged the edges with a rolled hem, because I think it looks nicer and is much faster and easy.
 

Unfortunately, I did not have time to make a tutorial, so hopefully you can either figure it out by the pictures or it will inspire you make a style of your own. Making a pattern for an apron is not as hard as it sounds.  Here are some starting points to help you along:

1.    The waist piece should be 18-19inches long, finished, so add enough for a seam allowance when cutting.

2.    Choose where you want the waist piece to sit. I like to have my waist piece to sit a little high, just a little under the chest.  Measure from the top of where you want the waist piece to lay to the collar bone. Use these measurements to make a pattern for the top. I made mine into some sort of triangles and made them wide enough to overlap and to gather in the center.

3.    My bottom piece was only 19 inches long. The part matching the waist piece was 19 inches wide plus extra for a seam allowance. But the lower hem was a few inches wider (somewhere around 4 inches wider).

4.    My waist ties are always the full width of fabric 40-44”.

I hope these tips have helped somewhat. Next time I will make sure to make a tutorial. Good Luck!

Sunday, March 24, 2013

Red and Black Fabric Flower Wreath

I was in need of a last minute activity idea for my Laurel class in Young Women. Our original activity had fallen through, and I had a day to throw something together. I got on Pinterest to look for ideas, but everything needed some sort of preparation that I didn't have time for. Finally, I came up with an idea of my own. I had a ton of craft supplies lying around my house. I could bring a big variety of supplies and we could have a Craft War. I figured the girls were familiar with Pinterest and could come up with some pretty cute ideas. I wouldn't say the activity was quite a success, but it was still fun. It would have been a great idea to do with my sisters or some of my adult friends who are big into crafting. I will probably plan something like that this summer when I go to visit.
 
As I sat watching the girls create, I decided I wanted to make something too. I really like crafting and using my hands. Just sitting there was making my fingers twitch and I could see ideas dancing in my head, so I settled of making a wreath for my living room.


I started by cutting a bunch of squares out of my fabric. They don't need to be perfect.
 
 Then I put a big glob of hot glue in the center of the squares. (never mind the messing glue gun)
 
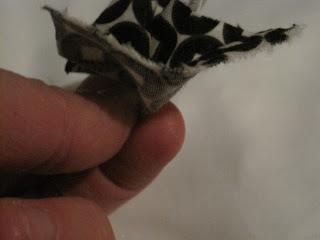
 Grab the underside in the middle; Pinch and twist.

 Once you have a bunch of the pinched fabric pieces, cut a circle out of some felt. Notice it is not perfect, it doesn't matter. Add a glob of glue and start placing the the twisted points of the fabric on the felt. It will take a lot of twisted peices of fabric to make it full.
 
 This is what it will look like when you are finished.

Once your flowers are done, you can start glueing your flowers to your wreath.
 
Add a bow and you are done. I love how it turned out.

Total Cost: $1
Wreath from the dollar store
Left over fabric scraps and ribbon.

Friday, March 15, 2013

PB & J Granola


I told you once that I love breakfast. It is so true. I also told you that we next to never eat cold cereal from a box. One of our favorite things to eat for breakfast is homemade granola. We have many delicious recipes for granola.

This is one I came up with, when I was looking for a new recipe and experimenting with a few new things. I wanted to see if you could use applesauce for part of the oil to make it lower fat. The result was delicious and it quickly became one of my children’s favorite granola recipes so far, only to be beaten by my chocolate granola and a granola recipe I grew up with.  I will share those recipes later.

I call this recipe PB&J Granola, because it reminds me of a peanut butter and jelly sandwich. I should tell you I prefer a softer granola, because that is what I was raised with. I don’t really care much for the crunchy granolas, they are just too tough and chewy and I think there is more flavor in the soft stuff. That’s just my opinion. I understand that many people like it crunchy, so I have included directions to make it so. I hope you like it as much as we do, however you choose to make it.


Julie’s PB & J Granola

1 cup Agave Syrup (I like the brand Xagave best, but you could use another brand or even honey)
1 cup Peanut Butter
¼ cup Coconut Oil
2 individual cups of berry applesauce
8 cups Oatmeal
1 ½ cups Coconut Flakes

Preheat the oven to 325 degrees.

Put the first four ingredients in a sauce pan on medium heat; mix till smooth. Add oatmeal and coconut flakes and stir well until thoroughly mixed.

Spread on a couple of cookie sheets or in cake pans. (If you want a crunchier texture, spread out in a thin layer on a 2-3 cookie sheets.  For a softer granola, spread out granola in two cake pans in a thick layer.) Cook for 10 minutes; stir granola around in the pans with a spatula. Cook for 10 minutes more. Let cool.


Serve in a bowl with milk or as a snack. Store in an airtight container for up  two weeks on the shelf or up to six months in the freezer. ENJOY!

1 cup =1 serving

Note: This makes a pretty good size batch of granola. This is what I make for my large family. You may choose to half or quarter the recipe.

Friday, March 8, 2013

Strawberries and Cream Farina


I love Breakfast! It is probably my favorite meal of the day. We love granola, hot cereals, eggs, pancakes with homemade syrup, etc. I like to have variety in all my meals .

Over a year and a half ago, we pretty much stopped eating cold cereal. I just came to a point in my life where I wanted to eat more whole foods and less processed foods. I believe everyone is on a food journey and mine was taking me in a direction away from processed foods. I try really hard to make most of our foods by scratch. There is just something special about knowing exactly what you are eating and being able to pronounce all the ingredients names. Before this time, some may say, we were addicted to cold cereal. We were in a breakfast rut. But as I said, it was a time of change for us.

Up until that point I did not really care for hot cereal. But we have learned what we like and how we like to eat hot cereal. I can honestly say now that I LOVE HOT CEREAL!  We eat hot cereal about 3-4 times a week. We eat a variety of hot cereals. It’s not just oatmeal with raisins and brown sugar every day. That would be boring.

In Utah, there is this historic granary called Lehi Roller Mills. Maybe you have heard of it. Parts of the original movie Footloose were filmed there. Ring a bell?  Any way, they have this amazing hot cereal called Strawberries and Cream Germade. It is delicious. My family loves it, but it can be quite expensive for a bigger family like mine. At one point they used to sell it in a 25 pound bag and that is how I liked to buy it. Then they stopped and now you can only buy it in a four pound bag (I believe that’s what size it is). A four pound doesn’t go very far for a large family like mine.

Well one day, as I was lamenting over not being able to get this delightful cereal in bulk any more, it hit me that I could try and recreate it. It just so happened that I had strawberries in my fridge. I had powdered coffee creamer in my pantry. And I had farina in my cupboard. I had an idea. I made it and we loved it.  We love it even better than the stuff you can buy. It tastes so much better with real strawberries. It is like dessert for breakfast.
 
Let’s just get this out of the way. Some of you may say: What is farina? What is germade? Have you heard of Cream of Wheat? They are the same thing, only way cheaper. I buy mine in bulk. If you buy a huge bag at Lehi Roller Mills, it will be called germade. Yes, they still have the plain germade available in 25 pound bags. If you live in the West and are lucky enough to have a WinCo near you, it is called farina. I can also get farina pretty cheap near me at an Amish bulk food store. Or you can stick with the expensive Cream of Wheat. You often find it at Natural food stores. You can even find it at Walmart. It doesn’t matter where you buy it, it is all the same.


Strawberries and Cream Farina (aka. Germade or Cream of Wheat)

Serves 4


4 cups water

½ tsp salt

2/3 cup farina

¼ cup powdered creamer

1/3–½ cup sugar* (adjust to your taste)

¾ cup finely chopped** strawberries*** (about a 3rd of a pound)


Bring water and salt to a boil in a saucepan on the stove. Slowly add in the farina and the creamer, using a whisk to mix it well, so no lumps can form.  Lower heat to a medium-low.  Stir continuously for 6-8 minutes till it is to the thickness you like. I usually add the sugar and strawberries and cook for an extra minute.  Serve with milk (optional) and
ENJOY!


* You can adjust the sugar to the sweetness you prefer. The kids and I like it semi-sweet, but not all out candied. My husband prefers very lightly sweetened. Play with it and see what you like. Start with less and then add more as desired.
**I use a small food processor to chop up my strawberries to a somewhat course texture.


*** We have tried many other fruits: blueberries, blackberries, peaches, nectarines, etc. We have liked them all, but strawberries have remained out favorite. Use whatever fruit you prefer or have on hand. For fruits that may not be as tart, you may choose to add a little lemon juice (l used some when I made it with nectarines).

Saturday, March 2, 2013

My Painted Book Wreath


I’m not much of a decorator. There I said it.

 Let’s be honest, I haven’t really tried much. Money has been tight most of my marriage and so buying decorations haven’t really been my top priority.  When it comes to the choice of buying a piece of decoration for a room or buying a much needed article of clothing, the clothing seems to win out every single time.  Often times, buying decorations has seemed so frivilous to me, even a waste of money. Now I know there are a lot you out there that love to decorate and buy pretty things for your home. I think that is wonderful. I am just saying, when there isn’t much money to go around, buying decorations is at the bottom of my list.

Now crafting and sewing, on the other hand, rank much higher on my list, especially if I can do it cheap. Making stuff with my hands makes me happy. When I discovered Pinterest a year and a half ago, I found all these beautiful things I could make (and for cheap!)and I realized maybe I do like decorating.  I REALLY like making stuff. Really, really like it. Making pretty things helps me relax, gives me pride in my creations, and gives me bragging rights to my sisters. My sisters like to craft and sew as much as I do. We are all crafting and sewing junkies. It’s in our blood.  

I have recently discovered Book Wreaths and I am in love. I decided it was time to try my hands on making one.  I had a certain look I was going for. I liked this wreath a lot (http://www.theidearoom.net/2010/03/book-wreath.html). I liked the ruffle look and the burned edges. My original idea was to ink the edged red with a stamp pad, and then to hang it in my hall. But, as I started to make it, I realized it was going to be much bigger than I originally thought  and I realized it wasn’t going to work in the planned spot. But that’s okay, I needed some sort of art to hang above my bed and this became it.  So in the end, I lightly sprayed the edges with a Robin Egg Blue spray paint. I like it better. It gives it more depth.  Unfortunately, the pictures of wreath  give it don’t do it justice. It is quite a stunning wreath and is much deeper and richer in color than shown.

I wish I had made a tutorial for this, but as I didn’t, you will have to use your imagination with my descriptions.

First, the supplies you will need:

Any size wreath (styrofoam, wicker, straw, grapevine, etc.*)

1 -2 old books (or books from the dollar store**)

A hot glue gun

Lots and lots of glue sticks for your glue gun

A can of spray paint

Some Ribbon to hang it

*I bought my wreath from the dollar store. I bought the largest size they had. Since it was wicker, I just wrapped it in white paper so I could have a surface that I could glue the rolled paper to. You could do the same with a grapevine or straw wreath. Just don’t use a flat cardboard wreath, I like the dimension that the rounder wreaths give.

**I bought two books from the dollar store with white, white pages (most are a somewhat cream color). They had a lot of black and white pictures in them. They were the only ones I could find with white, white pages. At first, I wasn’t too excited about it. But now I think it gives it a lot more interest.
 
I started out by cutting strips the length of the book by 2 ½ inches wide. I was able to cut two strips per page. I just ripped the paged out carefully and then cut through several pages at a time to cut my widths. They didn’t look perfect and they didn’t need to.

I glued my ribbon around the wreath before I began, but you can glue it to the back in the end if you like.

Next, I rolled each strip in a variety of ways. Some I rolled just from one end. Some I rolled the ends toward each other. Some I rolled the ends the opposite directions. Some I rolled half the way and then  I just ruffed the rest (rolled the paper front then back then front then back). Just play with it. It doesn’t need to be an exact science.

I always secured the bottom edges (insides) with hot glue so they wouldn’t unroll, and then pinched the bottom.

Then, I put a generous amount of hot glue on the bottom edge and would secure it to the wreath. You will need to hold it in place while it dries, so it will stand in the direction you want it to. I would often put a dot of glue on the side to secure it to a piece next to it. As it gets fuller, you will have to hold the rolled pieces for less time while the glue cools, since it will have other pieces to hold it up.

Finish, by lightly spray painting the wreath. Spray till you get the richness of color you are looking for.  The color doesn’t need to be even all over. I think it looks more interesting if it isn’t even.

FYI, the finished wreath is quite sturdy and is not likely to be easily damage thanks to all of the hot glue I used. I feared that it would easily crush, but I have sat up many of times in my bed hitting it accidentally and not a single dent.

My finished wreath measures 23 inches across.
 
How much did my masterpiece wreath cost?

$1 for the wreath (I bought at the dollar store)

$2 for 2 books (I bought these at the dollar store)

$1 for Hot glue sticks (You can also buy these at the dollar store, I already had a ton lying around)

$3.64 for a can of spray paint   

The grand total for this project was roughly $8 with tax. But, I had lots of spray paint left over and some glues sticks that I can use for another day and another project. Yours could be a little cheaper if you choose a smaller wreath (you may only need one book) or if you choose not to make it as full as mine or if you buy the $0.97 spray paint at Walmart.


How long did it take to make?

I don’t really want to answer this. It took a long time. I would say about 10 hours, but I did it while I watched television at night as I wound down after the kids went to bed. It took me about 3 weeks to finish. You may be able to finish it a lot faster if you have more free time than me and if you make a smaller wreath.

Good Luck!

Thursday, February 21, 2013

A Homemade Valentine

This year we decided to have a homemade Valentines Day. I have to say it was one of our most favorite Valentines Day so far as a family. It made it feel more meaningful. We loved it so much, we have decided to always make our own cards to exchange with each other.
 
The first cards I made for the Young Women in my Ward (at church). I really was hoping to use my Cricut for them, but realized that all my cartridges are still in Utah. So I got to hand cut out pieces for 20 cards. I think it was worth the effort and well recieved by the girls.
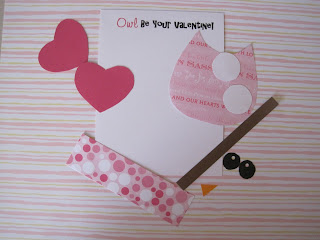
Here are what the pieces looked like before the gluing.

Here is what a few of them looked liked when they were finished. This is where I got my inspiration:http://www.artsyfartsymama.com/2012/02/owl-valentines-printable.html  

And lastly the homemade cards we exchanged as a family. Most of our ideas we got off Pinterest.
 
My husband's were very simple, with a very sweet poem he wrote for each member of our family. Unfortunately, I will not be sharing his poem, because it was meant for me only. Sorry.
 
I chose a very simple "I love you More than Naps" because my children kept saying that they knew which card I would make which or originally said "I like you and Naps". I changed it up for fun. This is the link for my inspiration: http://www.murraymitchell.com/2012/02/i-like-you-and-naps-card/
One of my Sons made Smarty Pants cards. The inspiration came from: http://themuddyprincess.blogspot.com/2011/06/smartie-pants.html
 
Another Son made the holster and gun card. Probably wouldn't be appropriate for public school. But he sure had fun making them for the family. This is where he got the idea: http://sherellechristensen.typepad.com/my_weblog/2011/01/stick-em-up-valentines.html
 
 
My youngest son couldn't make his own cards, so we chose to make the "You are the raisin I am smiling" cards, because it just reminded us of him. Idea from: http://www.justmarriedwithcoupons.com/2013/01/printable-valentines-day-craft-youre-the-raisin.html
 
 
My oldest daught made the "(eye) (heart) you" cards. They fit her just right. The inspiration came from: http://www.parents.com/holiday/valentines-day/cards/heartfelt-valentines/
 
 
And finally my youngest daughter gave the "I love you beary much cards". I made these myself by copying a free coloring page from here: http://coloringpagesfun.blogspot.com/2012/01/care-bear-coloring-pages.html and adding the word to the bottom. She just really wanted to give gummy bears with her Valentines cards.


As you can see they don't necessarily look like the original, but they had personality that came with them. They also came with love and were much more cherished than any card from the store could ever be. We loved our homemade Valentines. Thanks to Pinterest for being the means to help us have a wonderful Valentines Day. I hope yours was just as special.

Monday, February 18, 2013

Giving Back

I decided it was time to start giving back. I have benefited from so many other blogs and have been so grateful for the information that they have provided me. As I sat looking through blog after blog, I realized I also have something to give and share with others. I have ideas too! So now it it my turn to give back as a thank you to all who have shared with me. So thanks to all bloggers out there who have blessed my life, given amazing ideas, shared little secrets that work, helped me be better with cleaning, save money, craft and sew to my hearts content, gave ideas on how to have fun with the kids and family, helped me decorate my home,and so on and so forth. Hopefully I can do the same for others out there. So here is to me giving back.